
Raspberry Pi2 始動 (2015/02/07)
Raspberry Pi 2 Model B が2015年2月2日に発表されて、その日のうちに購入できるようになりました。 気が付いたのが比較的早かったため、2月6日に入手することができました。 Raspberry Pi Model B+ と同じ価格($35)で、メモリが2倍の1GBになって、CPUもシングルコアの700 MHz ARM11 ARM1176JZF-S(BCM2835) からクアッドコアの900MHz Cortex-A7(BCM2836) に変更されています。
また、Raspberry Pi 専用の Debian 系 Linux である Raspbian も Raspberry Pi 2 の登場に合わせて新イメージが 公開されました。 2015-01-31-raspbian とファイル名から wheezy の名前が消えています。 Debian の次のバージョン Debian 8 (jessie) がまもなくリリースされるのに合わせているのかもしれません。 今回のディスクイメージは Pi2 用のカーネルが追加されたり、デバイスツリー用のデータが色々追加されたりと、HAT(Hardware Attached on Top) と呼ばれる Raspberry Pi Model B+ 以降用の拡張ボードの規格に合わせた製品への準備が始まっている感じです。
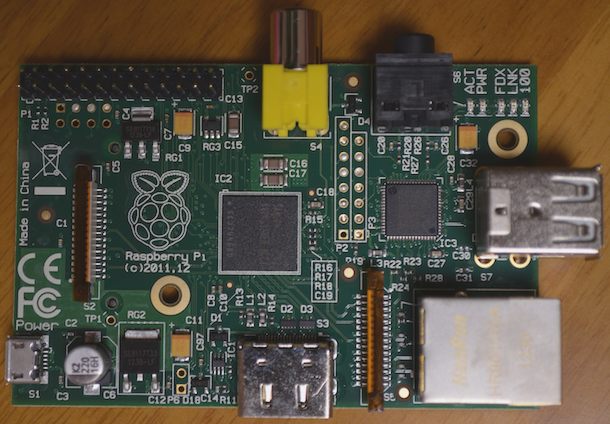
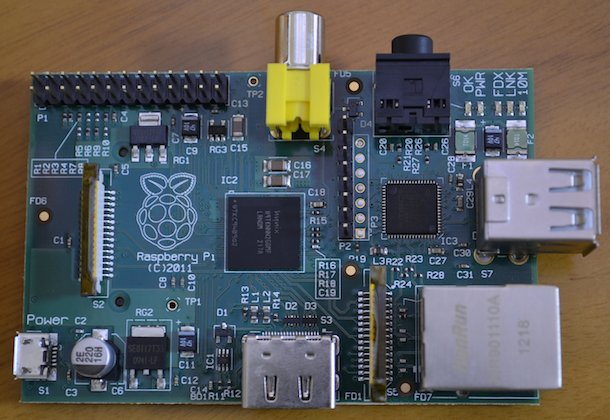
歴代 Raspberry Pi Model B
今回購入した Raspberry Pi 2で4台目、4機種になりました。せっかくなので、これまでに発売された4種類の Raspberry Pi Model B の写真を掲載します。初代から見るとメモリもCPUのコア数も4倍になっているにもかかわらず、すべて35ドルとはスゴイですね。
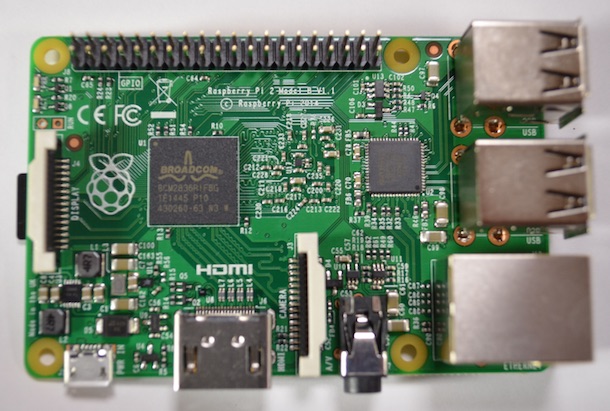
Raspberry Pi 2 Model B (2015/02/06 到着)
Cortex-A7 (BCM2836) 900MHz クワッドコア、メモリ1GB(基板裏)。CPUコア4倍、メモリ2倍。
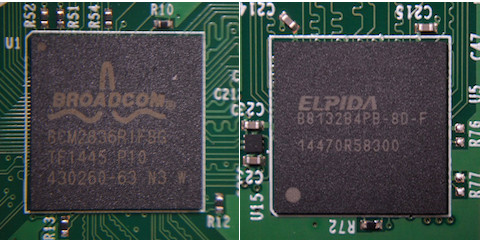
Raspberry Pi 2 Model B のCPUとメモリ
CPUが基板の表、メモリが裏に実装されています。ELPIDA製のメモリが使われています。
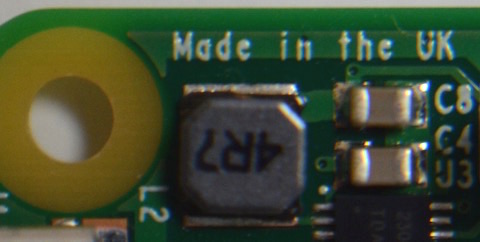
Made in the UK
基板の端に小さく書いてあります。
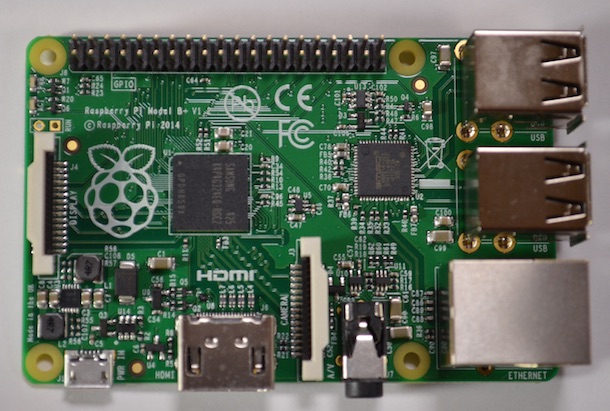
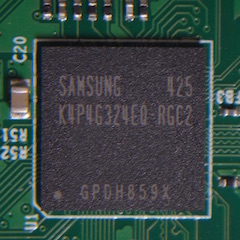
Raspberry Pi Model B+ (2014/11/11 到着)
ARM1176JZF-S (BCM2835) 700MHz シングルコア、メモリ512MB(PoP)。GPIOコネクタ40ピン、USB 2倍。
Package on Package
CPU の上にメモリが載る、2階建てで実装されているため、SAMSUNG製のメモリだけが見えます。
Raspberry Pi Model B Rev.2 (2012/12/20 到着)
ARM1176JZF-S(BCM2835) 700MHz シングルコア、メモリ512MB(PoP)。メモリ倍増。
Raspberry Pi Model B Rev.1 (2012/07/19 到着)
ARM1176JZF-S(BCM2835) 700MHz シングルコア、メモリ256MB(PoP)。初代。
2015-01-31-raspbian のインストール
今回のディスクイメージは、Raspberry Pi と Raspberry Pi2 の共通ディスクイメージになっています。 Linux カーネルのバージョンが 3.18 まで上がっています。 Raspberry Pi 用の kernel.img と Raspberry Pi2 用の kernel7.img の2種類が ブートパーティションに含まれています。また、/boot/overlays/ ディレクトリが用意されていて新しくデバイスツリーを使うように変更されています。
以下の作業を行った SD カードはデータがすべて初期化されるので、新しいカードやデータが不要なSDカードを使って下さい。
いつものように MacBook Pro17(MacOSX 10.10.2) でインストール作業した記録です。 MacOS X ではデバイス名の指定方法が異なるだけで、Linuxと同じく dd コマンドを使ってSDカードに ディスクイメージを書き込みます。まずは SDカードのデバイス名を調べます。以下の例は、私のMacBookでの例です。適宜読み替えてください。
dd コマンドのデバイスの指定を間違えると最悪ハードディスクがすべて消えるなどの悲惨な結果が待っています。十分に注意して行なってください。
$ uname -rsv
Darwin 14.1.0 Darwin Kernel Version 14.1.0: Mon Dec 22 23:10:38 PST 2014;
root:xnu-2782.10.72~2/RELEASE_X86_64
ダウンロードしたディスクイメージは以下のサイズです。
$ ls -lt
-rw-r--r--@  1 jun  staff  1024431943  2  2 23:30 2015-01-31-raspbian.zip
イメージのハッシュ(SHA-1 Checksum)が公式サイトにある 0171e77f687c447dae32609fcc6aa700c750d6f5 であることを確認します。
$ shasum 2015-01-31-raspbian.zip
0171e77f687c447dae32609fcc6aa700c750d6f5  2015-01-31-raspbian.zip
いつものようにMacBook Pro17 にUSB接続のmicroSDカードリーダを接続して、SDカードをアンマウントします。
$ df -k
Filesystem   1024-blocks    Used Available Capacity  iused   ifree %iused  Mounted on
 略
/dev/disk2s1   15343616      1952  15341664     1%      0       0  100%    /Volumes/NO NAME

$ diskutil unmount /dev/disk2s1
Volume NO NAME on disk2s1 unmounted
今回のSDカードは、安かったので microSDHC 16GB Class10 を新しく3枚買ったうちの1枚です。
$ sudo fdisk -i /dev/disk2
Password:
fdisk: could not open MBR file /usr/standalone/i386/boot0: No such file or directory

  -----------------------------------------------------
  ------ ATTENTION - UPDATING MASTER BOOT RECORD ------
  -----------------------------------------------------

Do you wish to write new MBR and partition table? [n] y
パーティションを確認。
$ sudo fdisk /dev/disk2
Disk: /dev/disk2  geometry: 1911/255/63 [30703616 sectors]
Signature: 0xAA55
         Starting       Ending
 #: id  cyl  hd sec -  cyl  hd sec [     start -       size]
------------------------------------------------------------------------
*1: AB    0   1   1 - 1023 254  63 [        63 -      16384] Darwin Boot
 2: AF 1023 254  63 - 1023 254  63 [     16447 -   30687169] HFS+
 3: 00    0   0   0 -    0   0   0 [         0 -          0] unused
 4: 00    0   0   0 -    0   0   0 [         0 -          0] unused
zipファイルを展開します。
$ unzip 2015-01-31-raspbian.zip
Archive:  2015-01-31-raspbian.zip
  inflating: 2015-01-31-raspbian.img

$ ls -lt 2015-01-31-raspbian*
-rw-r--r--@ 1 jun  staff  1024431943  2  2 23:30 2015-01-31-raspbian.zip
-rw-r--r--@ 1 jun  staff  3276800000  2  1 06:36 2015-01-31-raspbian.img
SDカードに書き込みます。
$ sudo time dd bs=1m if=2015-01-31-raspbian.img of=/dev/rdisk2
3125+0 records in
3125+0 records out
3276800000 bytes transferred in 297.655400 secs (11008703 bytes/sec)
      297.68 real         0.01 user         2.37 sys
ブート領域のファイルを確認します。
$ cd /Volumes/boot
$ ls -lt
total 29200
-rwxrwxrwx  1 jun  staff    18693  1 31 19:54 COPYING.linux
-rwxrwxrwx  1 jun  staff     1447  1 31 19:54 LICENCE.broadcom
-rwxrwxrwx  1 jun  staff    18974  9 25  2013 LICENSE.oracle
-rwxrwxrwx  1 jun  staff     4275  1 31 19:54 bcm2708-rpi-b-plus.dtb
-rwxrwxrwx  1 jun  staff     4275  1 31 19:54 bcm2708-rpi-b.dtb
-rwxrwxrwx  1 jun  staff     5217  1 31 19:54 bcm2709-rpi-2-b.dtb
-rwxrwxrwx  1 jun  staff    17848  1 31 19:54 bootcode.bin
-rwxrwxrwx  1 jun  staff      120  1 31 20:38 cmdline.txt
-rwxrwxrwx  1 jun  staff     1312  1 31 20:38 config.txt
-rwxrwxrwx  1 jun  staff     6135  1 31 19:54 fixup.dat
-rwxrwxrwx  1 jun  staff     2347  1 31 19:54 fixup_cd.dat
-rwxrwxrwx  1 jun  staff     9189  1 31 19:54 fixup_x.dat
-rwxrwxrwx  1 jun  staff      137  1 31 21:24 issue.txt
-rwxrwxrwx  1 jun  staff  3994916  1 31 19:54 kernel.img
-rwxrwxrwx  1 jun  staff  3968136  1 31 19:54 kernel7.img
drwxrwxrwx  1 jun  staff     8192  1 31 20:39 overlays
-rwxrwxrwx  1 jun  staff  2641528  1 31 19:54 start.elf
-rwxrwxrwx  1 jun  staff   553784  1 31 19:54 start_cd.elf
-rwxrwxrwx  1 jun  staff  3598504  1 31 19:54 start_x.elf
Raspberry Pi2用のカーネルイメージの kernel7.img がこれまでより増えています。 また、bcm2708-rpi-b-plus.dtb、bcm2708-rpi-b.dtb、bcm2709-rpi-2-b.dtb の3つのファイルがデバイスツリーのファイルとして新しく増えています。さらに、 overlays というディレクトリも追加されています。
$ cd overlays/
$ ls -l
total 192
-rwxrwxrwx  1 jun  staff  8018  1 31 19:54 README
-rwxrwxrwx  1 jun  staff   779  1 31 19:54 hifiberry-amp-overlay.dtb
-rwxrwxrwx  1 jun  staff   655  1 31 19:54 hifiberry-dac-overlay.dtb
-rwxrwxrwx  1 jun  staff   783  1 31 19:54 hifiberry-dacplus-overlay.dtb
-rwxrwxrwx  1 jun  staff   783  1 31 19:54 hifiberry-digi-overlay.dtb
-rwxrwxrwx  1 jun  staff   775  1 31 19:54 iqaudio-dac-overlay.dtb
-rwxrwxrwx  1 jun  staff   775  1 31 19:54 iqaudio-dacplus-overlay.dtb
-rwxrwxrwx  1 jun  staff  1428  1 31 19:54 lirc-rpi-overlay.dtb
-rwxrwxrwx  1 jun  staff   405  1 31 19:54 pcf8523-rtc-overlay.dtb
-rwxrwxrwx  1 jun  staff  1003  1 31 19:54 pps-gpio-overlay.dtb
-rwxrwxrwx  1 jun  staff  1017  1 31 19:54 w1-gpio-overlay.dtb
-rwxrwxrwx  1 jun  staff  1184  1 31 19:54 w1-gpio-pullup-overlay.dtb
デバイスツリーの定義ファイルがたくさん入っています。READMEを見てみましょう。 ハードウェアの違いを吸収するため、色々なハードウェアの個別の設定値をカーネルの外で用意しておいて、起動時にカーネルに渡すことで1種類のカーネルで多くのハードウェアに対応する仕組みのようです。READMEの最後のリンク先にも詳細な説明があるようです(私はまだちゃんと読んでいません)。
$ cat README
Introduction
============

This directory contains Device Tree overlays. Device Tree makes it possible
to support many hardware configurations with a single kernel and without the
need to explicitly load or blacklist kernel modules. Note that this isn't a
"pure" Device Tree configuration (c.f. MACH_BCM2835) - some on-board devices
are still configured by the board support code, but the intention is to
eventually reach that goal.

On Raspberry Pi, Device Tree usage is controlled from /boot/config.txt. By
default, the Raspberry Pi kernel boots with device tree enabled. You can
completely disable DT usage (for now) by adding:

    device_tree=

to your config.txt, which should cause your Pi to revert to the old way of
doing things after a reboot.

In /boot you will find a .dtb for each base platform. This describes the
hardware that is part of the Raspberry Pi board. The loader (start.elf and its
siblings) selects the .dtb file appropriate for the platform by name, and reads
it into memory. At this point, all of the optional interfaces (i2c, i2s, spi)
are disabled, but they can be enabled using Device Tree parameters:

    dtparam=i2c=on,i2s=on,spi=on

However, this shouldn't be necessary in many use cases because loading an
overlay that requires one of those interfaces will cause it to be enabled
automatically, and it is advisable to only enable interfaces if they are
needed.

Configuring additional, optional hardware is done using Device Tree overlays
(see below).

raspi-config
============

The Advanced Options section of the raspi-config utility can enable and disable
Device Tree use, as well as toggling the I2C and SPI interfaces. Note that it
is possible to both enable an interface and blacklist the driver, if for some
reason you should want to defer the loading.

Modules
=======

As well as describing the hardware, Device Tree also gives enough information
to allow suitable driver modules to be located and loaded, with the corollary
that unneeded modules are not loaded. As a result it should be possible to
remove lines from /etc/modules, and /etc/modprobe.d/raspi-blacklist.conf can
have its contents deleted (or commented out).

Using Overlays
==============

Overlays are loaded using the "dtoverlay" directive. As an example, consider the
popular lirc-rpi module, the Linux Infrared Remote Control driver. In the
pre-DT world this would be loaded from /etc/modules, with an explicit
"modprobe lirc-rpi" command, or programmatically by lircd. With DT enabled,
this becomes a line in config.txt:

    dtoverlay=lirc-rpi

This causes the file /boot/overlays/lirc-rpi-overlay.dtb to be loaded. By
default it will use pins 17 (out) and 18 (in), but this can be modified using
DT parameters:

    dtoverlay=lirc-rpi,gpio_out_pin=17,gpio_in_pin=13

Parameters always have default values, although in some cases (e.g. "w1-gpio")
it is necessary to provided multiple overlays in order to get the desired
behaviour. See the list of overlays below for a description of the parameters and their defaults.

The Overlay and Parameter Reference
===================================

File:
Info:   Describes the base Raspberry Pi hardware
Load:
Params:
        i2c_arm (default "off")  Set to "on" to enable the ARM's i2c interface
        i2c_vc (default "off")   Set to "on" to enable the i2c interface
                                 usually reserved for the VideoCore processor
        i2c                      An alias for i2c_arm
        i2s (default "off")      Set to "on" to enable the i2s interface
        spi (default "off")      Set to "on" to enable the spi interfaces
        act_led_trigger (default "mmc")
                                 Choose which activity the LED tracks.
                                 Use "heartbeat" for a nice load indicator.
        act_led_activelow (default "off")
                                 Set to "on" to invert the sense of the LED
        act_led_gpio (default "16" on a non-Plus board, "47" on a Plus)
                                 Set which GPIO pin to use for the activity LED
                                 (in case you want to connect it to an external
                                 device).

        N.B. It is recommended to only enable those interfaces that are needed.
        Leaving all interfaces enabled can lead to unwanted behaviour (i2c_vc
        interfering with Pi Camera, I2S and SPI hogging GPIO pins, etc.)
        Note also that i2c_arm and i2c_vc are aliases for the physical
        interfaces i2c0 and i2c1. Use of the numeric variants is still possible
        but deprecated because the ARM/VC assignments differ between board
        revisions.

File:   hifiberry-amp-overlay.dtb
Info:   Describes the HifiBerry Amp and Amp+ audio cards
Load:   dtoverlay=hifiberry-amp
Params: <None>

以下 個別の拡張ボードに関する記述は省略

Troubleshooting
===============

If you are experiencing problems that you think are DT-related, enable DT
diagnostic output by adding this to /boot/config.txt:

    dtdebug=on

and rebooting. Then run:

    sudo vcdbg log msg

and look for relevant messages.

Further reading
===============

This is only meant to be a quick introduction to the subject of Device Tree on
Raspberry Pi. There is a more complete explanation here:

https://www.raspberrypi.org/documentation/configuration/device-tree.md
カーネルがいろいろなデバイスに対応できるようにデバイスの設定を書いておくファイルのようです。ここで用意されている拡張子が dtb のファイルは既に市販されている HAT(Hardware Attached on Top) と呼ばれる拡張ボードに対する設定になっています。 これまでは拡張ボードを購入してもLinuxに詳しくないと使えなかったりしていたものが、メーカ側で用意したファイルを/boot/overlays/ 以下に置いて、/boot/config.txt にちょっと追加すれば比較的簡単に使えるようになるのでしょう。
/boot/config.txt を確認してみます。 まだデバイスツリー関連の記述は追加されていません。 これまでと同じ内容です。
$cat config.txt
# For more options and information see
# https://www.raspberrypi.org/documentation/configuration/config-txt.md
# Some settings may impact device functionality. See link above for details

# uncomment if you get no picture on HDMI for a default "safe" mode
#hdmi_safe=1

# uncomment this if your display has a black border of unused pixels visible
# and your display can output without overscan
#disable_overscan=1

# uncomment the following to adjust overscan. Use positive numbers if console
# goes off screen, and negative if there is too much border
#overscan_left=16
#overscan_right=16
#overscan_top=16
#overscan_bottom=16

# uncomment to force a console size. By default it will be display's size minus
# overscan.
#framebuffer_width=1280
#framebuffer_height=720

# uncomment if hdmi display is not detected and composite is being output
#hdmi_force_hotplug=1

# uncomment to force a specific HDMI mode (this will force VGA)
#hdmi_group=1
#hdmi_mode=1

# uncomment to force a HDMI mode rather than DVI. This can make audio work in
# DMT (computer monitor) modes
#hdmi_drive=2

# uncomment to increase signal to HDMI, if you have interference, blanking, or
# no display
#config_hdmi_boost=4

# uncomment for composite PAL
#sdtv_mode=2

#uncomment to overclock the arm. 700 MHz is the default.
#arm_freq=800
以上、MacOSX側でディスクイメージをのぞいて分かったことです。Raspberry Pi 2 で動かすため、Mac から SDカードをアンマウントして取り出します。
$ df -k
Filesystem   1024-blocks    Used Available Capacity  iused     ifree %iused  Mounted on
 略
/dev/disk2s2   3089272   2401836    530508    82%    83254    112970   42%   /Volumes/Untitled
/dev/disk2s1     57288      9952     47336    18%      512         0  100%   /Volumes/boot

$ diskutil unmount /dev/disk2s1
Volume boot on disk2s1 unmounted
$ diskutil unmount /dev/disk2s2
Volume  on disk2s2 unmounted
新しいイメージで起動
raspi-config による初期設定
インストールしたSDカードをRaspberry Pi 2 にセットして起動します。 最初の起動時に設定画面が表示されます。 基本的に2013-09-25-wheezy-raspbian の設定画面の解説と同じですが、異なる部分だけ紹介します。
Advanced Options
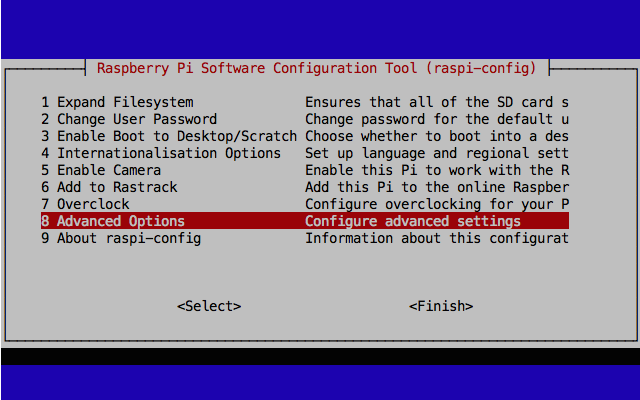
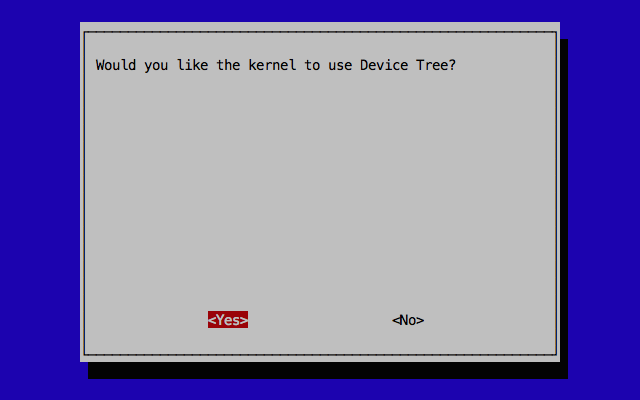
Device Tree
「8 Advanced Options」を選ぶと「A5 Device Tree 」の設定が表示されます。

デバイスツリーを使用する設定がデフォルトになっています。
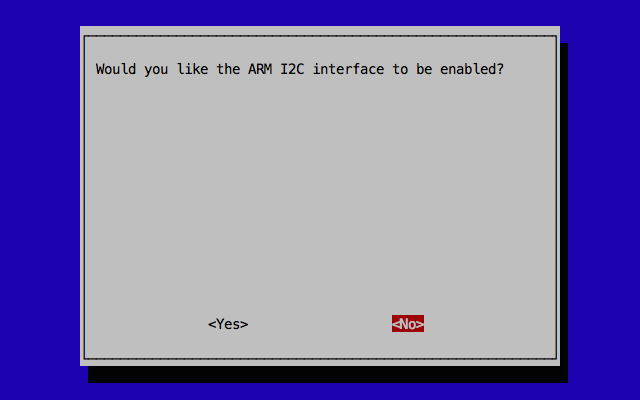
I2C
I2Cバスで接続されたデバイスを使用する場合は有効にします。
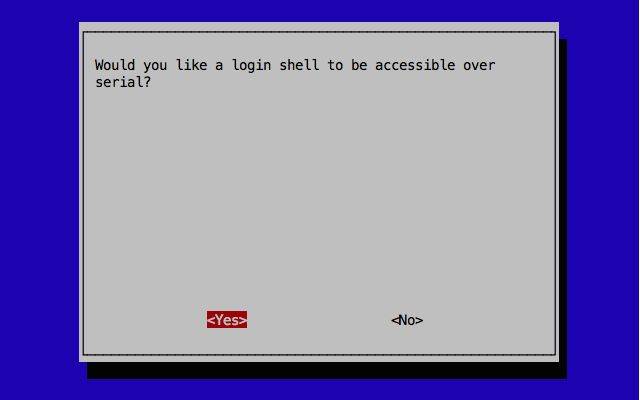
Serial
シリアルコンソールを接続する場合は有効にします。
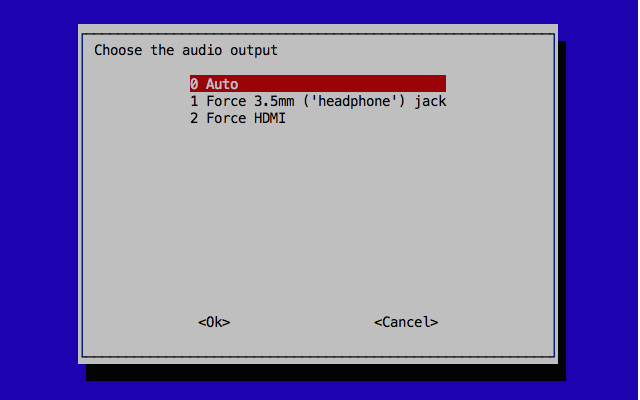
Audio
音の出力先の設定です。
ちょっと使ってみる
カーネルのバージョンは uname コマンドで確認できます。2015/02/07時点で最新のカーネルは 3.18.6 (2015/02/06 リリース) なので、最新と言っていいでしょう。
pi@raspberrypi ~ $ uname -a
Linux raspberrypi 3.18.5-v7+ #225 SMP PREEMPT Fri Jan 30 18:53:55 GMT 2015 armv7l GNU/Linux
CPU温度の確認
CPUの温度を見てみます。Raspberry Pi2を3時間ほど稼働(室温20度)した時の温度です。 /sys/class/thermal/thermal_zone0/temp を読みだすことで、1000分の1度単位の温度が取得できます。
pi@raspberrypi ~ $ cat /sys/class/thermal/thermal_zone0/temp
33628
クロックの確認
kHz単位でARMのクロックが確認できます。
まず最大値と最小値の設定内容です。
pi@raspberrypi ~ $ cat /sys/devices/system/cpu/cpu0/cpufreq/cpuinfo_max_freq
900000
pi@raspberrypi ~ $ cat /sys/devices/system/cpu/cpu0/cpufreq/cpuinfo_min_freq
600000
現在のクロック値
pi@raspberrypi ~ $ cat /sys/devices/system/cpu/cpu0/cpufreq/scaling_cur_freq
600000
アイドルに近い状態では900MHzではなく、600MHzで動作しています。CPUに負荷をかけるとオーバークロックで設定した周波数に動的に切り替わります。CPUがアイドル状態に戻るとクロックも元に戻ります。
CPUに負荷をかけるために LjES で OpenGL で3Dアニメーションを実行した場合のクロックです。
pi@raspberrypi ~ $ cat /sys/devices/system/cpu/cpu0/cpufreq/scaling_cur_freq
900000
負荷をかけると 900MHz で動作することが確認できました。
その他の設定
デスクトップとして使う場合は、以下の記事を参考にして下さい。
- 日本語化
- デスクトップの軽量な日本語化と英語モードとの切替。
- デスクトップのカスタマイズ
- デスクトップのウィンドウやダイアログの色や形状を変更する方法。