
About LjES (2013/04/13)
LjES is a small 3D framework for Raspberry Pi built on top of the OpenGL ES 2.0. LjES is written by 100% LuaJIT. The goal of this framework is to make 3D graphics programming easy. The Raspbian Linux disk image contains the LuaJIT-2.0. You don't need to install any packages on a Raspberry Pi to use LjES.
LjES ver. 2.01 has been released. (2017/12/08)
GitHub (https://github.com/jun-mizutani/ljes.git )
Download
ljes-1.00.tar.gz (146KB), ljes-2.00.tar.gz
Commands below will download LjES and run the example application.
  curl -O https://www.mztn.org/rpi/ljes-1.00.tar.gz
  tar zxf ljes-1.00.tar.gz
  cd ljes-1.00
  cd examples
  luajit demo_spheres.lua
Hit [q] key to quit demo, [p] for screenshot.
An introduction to LjES
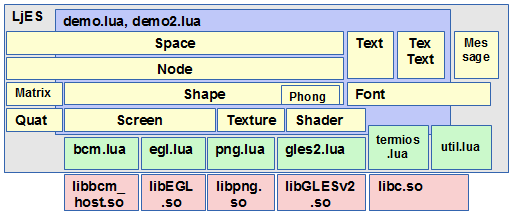
LjES is organized as shown in the figure below. A blue part (demo.lua and demo2.lua) of the illustration shows a simple framework using the entire LjES. The green parts (bcm.lua, egl.lua, png.lua, gles2.lua, termios.lua, util.lua) are the wrappers for the shared libraries of the Linux system (the red area in the figure). The yellow parts (all the rest) are the class libraries of LjES. These classes are responsible for the matrix calculation, the data transfer between CPU and GPU, shader programming required by OpenGL ES2.
Example
Example below is the minimum code required to animate the 3D scene using LjES. You can write an application program which displays the rotating donut with only 20 lines of code. If you modify the line in red, the shape and the motion of the object will change. The other part of the code seldom needs to be changed. In this example, you don't need to use the OpenGL ES2 API nor matrix calculation.
package.path = "../LjES/?.lua;" .. package.path
local demo = require("demo")

demo.screen(0, 0)

local aSpace = demo.getSpace()

local eye = aSpace:addNode(nil, "eye")
eye:setPosition(0, 0, 30)

demo.backgroundColor(0.2, 0.2, 0.4)

local shape = Shape:new()
shape:donut(8, 3, 16, 16)
shape:endShape()
shape:shaderParameter("color", {0.5, 0.3, 0.0, 1.0})

local node = aSpace:addNode(nil, "node1")
node:setPosition(0, 0, 0)
node:addShape(shape)

function draw()
  node:rotateX(0.1)
  aSpace:draw(eye)
end

demo.loop(draw, true)
demo.exit()
If you change the line "shape: donut(8, 3, 16, 16)", the following screens will be displayed. The example will end after about 80 seconds or when you press [q] key. If you hit [p] key, a screen shot will be saved with a file name "ss_date_time.png" at a current directory.
| donut(8, 3, 16, 16) | sphere(8, 16, 16) |
|---|---|
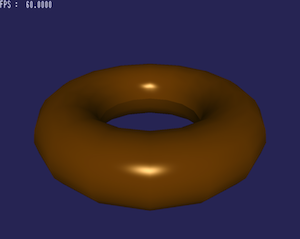 |
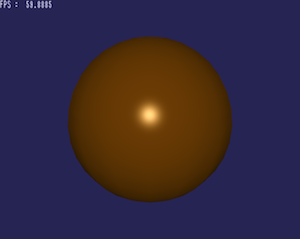 |
| double_cone(8, 8, 16) | truncated_cone(8, 2, 8, 16) |
 |
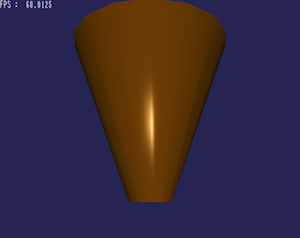 |
Description of sample code
It is exactly the same as the source of above, but put a line number to make it easier to explain the operation of each row.
01: package.path = "../LjES/?.lua;" .. package.path      -- (A)
02: local demo = require("demo")                         -- (B)
03:
04: demo.screen(0, 0)                                    -- (C)
05: demo.backgroundColor(0.2, 0.2, 0.4)                  -- (D)
06:
07: local aSpace = demo.getSpace()                       -- (E)
08:
09: local eye = aSpace:addNode(nil, "eye")               -- (F)
10: eye:setPosition(0, 0, 30)                            -- (G)
11:
12: local shape = Shape:new()                            -- (H)
13: shape:donut(8, 3, 16, 16)                            -- (I)
14: shape:endShape()                                     -- (J)
15: shape:shaderParameter("color", {0.5, 0.3, 0.0, 1.0}) -- (K)
16:
17: local node = aSpace:addNode(nil, "node1")            -- (L)
18: node:setPosition(0, 0, 0)                            -- (M)
19: node:addShape(shape)                                 -- (N)
20:
21: function draw()                                      -- (O)
22:   node:rotateX(0.1)                                  -- (P)
23:   aSpace:draw(eye)                                   -- (Q)
24: end
25:
26: demo.loop(draw, true)                                -- (R)
27: demo.exit()                                          -- (S)
Initialization
- (A) Setting the module search path
- A variable "package.path" contains the module search path. You must add LjES directory in the package.path if your code is in the example directory as shown below.
  --+-- LjES / ?.lua
    |
    +-- example / yourcode.lua
List of search path ../LjES/?.lua; ./?.lua; /usr/share/luajit-2.0.0-beta11/?.lua; /usr/local/share/lua/5.1/?.lua; /usr/local/share/lua/5.1/?/init.lua; /usr/share/lua/5.1/?.lua; /usr/share/lua/5.1/?/init.lua
- (B) Loading modules
- "require (" demo ")" returns the object (lua table) which contains the variables and functions for simple framework. Because it is assigned to a local variables "demo", you can perform the function of demo module in the form of demo.screen(). In addition, several class objects are defined in the modules that are loaded by demo.lua. The class objects such as Font, Matrix, Node, Object, Phong, Quat, Screen, Shader, Shape, Space and Text are registered as global variables. In the case of file names starting with a capital letter, the class with the same name will be registered in the global namespace in LjES.
- (C) Setting the display area
- demo.screen(0, 0) designates an area of the screen to be displayed by OpenGL ES2 as full screen. You can specify the screen size in the form of "demo.screen(width, height)".
- (D) Specifying the background color
-
- When the camera and object moves, the entire screen has to be rewritten. The color used to clear the screen is specified by three numbers R (red), G (green) and B (blue) in the range of 0.0 to 1.0. So demo.backgroundColor(0.2, 0.2, 0.4) makes the background dark blue.
- (E) Acquisition of a Space
- An instance of the class Space is required to register the 3D object. An instance of Space is created inside demo.lua. A local variable aSpace stores the space instance getting from demo.getSpace().
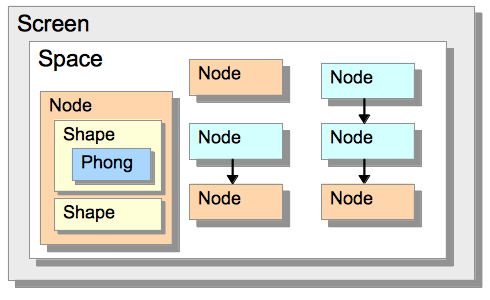
The Screen class is used to hold screen dimension, to initiate the graphics functionality. The Space class contains instances of Node class which holds position and orientation of objects. The Node class holds position, rotation and Shapes. Each Shape contains information of vertices, normals, faces, texture coordinates and a shader.
Setting camera
- (F) Creating a camera
- In order to view the 3D scene, you must specify the position and angle of the eye (camera). In LjES, camera is one of the instances of the Node class that exists in the Space. An instance of the Node class is added to the Space here.
- (G) Specifying the camera position
-
You can specify the location of the camera by setPosition(X, Y, Z) method of the node. The camera looks toward the negative Z-axis as the initial direction.
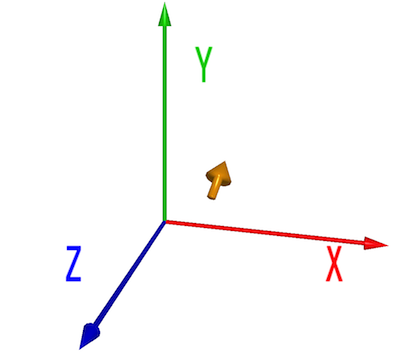
The camera stands back 30 units from the origin, and looks toward the origin.
Setting the shapes of the 3D object
- (H) Creating an instance of the shape
- The shapes of the 3D objects have to be registered as faces surrounded by vertices. The Shape class is used to store the information of the faces and the vertices.
- (I) Defining a donut shape
- The Shape class has several methods to define vertices and faces. The donut method registers the shape of donut.
- (J) Closing a shape definition
- Shape.endShape method plays very important role in LjES. It is a method that after you have registered vertices and faces, performs the computation of texture coordinates and vertex normal vectors to transfer the information to the GPU.
- (K) Specified the color of the object
- Properties of the surface of the object, such as color, contrast or shininess are determined by shader programs. We need to pass these properties to the shader program. The Shape:shaderParameter method can be used to specify a property for the shader program. The name and the value of the parameter depends the shader program. Phong shader in LjES understands the name such as "color", "tex_unit", "use_texture", "light", "emissive", "ambient" "specular", and "power" as the parameter.
Position and attitude of the 3D object
- (L) Creating the Node
- To specify the position and the attitude of the shape "donut", the shape has to be assigned to the instances of the Node class that exists in the Space. If the Node is added to the Space with a parent node, the node is in model coordinate system of the parent node. The node is in "global" or "world" coordinate system if its parent is nil.
- (M) Setting position
- Node:setPosition(0, 0, 0) places the node at the origin.
- (N) Assigning Shape to Node
- An instance of the Shape class for "donut" is assigned to the Node here.
Animation
- (O) Creating a function for drawing animation
- Every program that performs animation needs an animation loop function to draw the scene at regular intervals. This function will be called at 60 frames/second at maximum.
- (P) Rotating Node
- If you move or rotate the Node instance inside the animation loop function, the Node is moved or rotated continuously.
- (Q) Display the Space
- We have to call Space:draw method with the camera node to update the 3D scene at every frame.
- (R) Starting animation loop
- You must specify the animation loop function as the first argument of demo.loop function to start animation. The second argument is the flag to switch to display FPS (frames per second) value.
Termination
- (S) Restoring the console
- The function demo.exit() restores the console input. To accept the key input during the execution, the demo.lua reconfigures the console input as noecho and nowait. The demo.exit() restores this setting back to its original state. If an error occurs during the execution, the program may fail to return the key state. Type "./term.lua [Enter]" (Nothing appears when you press the key).